When it pertains to fashion and style, distressed jeans possess an undeniable allure. The weathered, vintage appearance imbues character and an air of natural chic into any ensemble. Whether you’re drawn to the grunge allure or simply eager to infuse a bit of edge into your wardrobe, distressing jeans present an enjoyable and inventive approach to attaining that coveted aesthetic.
Within this article, I’ll lead you through the process of distressing jeans using sandpaper, scissors, and bleach. So, let’s commence!
Why Distress Jeans?
-
Fashion and Style
Distressed jeans have solidified their place within the fashion realm, with designers and celebrities alike embracing this trend. The worn-out appearance introduces an essence of ruggedness and distinctiveness to any attire, rendering it a favored choice among fashion aficionados.
-
Vintage Appeal
For those who appreciate the timeless charisma of vintage attire, distressed jeans stand as an indispensable component of your closet. The frayed edges and faded wash generate an authentic vintage aesthetic, infusing a hint of nostalgia into your attire.
-
Versatility
Among the most commendable traits of distressed jeans is their versatility. They seamlessly transition between elevated and casual settings, contingent upon the occasion. Harmonize them with a pristine white blouse and stilettos for an elegant and refined look, or embrace a laid-back ambiance by coupling them with a graphic tee and sneakers.
-
Casual and Effortless
Distressed jeans emanate an unstrained and easygoing vibe that suits day-to-day wear exquisitely. Whether you’re engrossed in errands or rendezvous with friends for a brunch outing, these jeans effortlessly convey that effortlessly cool demeanor.
-
Creative Expression
Distressing jeans empower you to unleash your artistic inclinations and customize your denim. You can embark on diverse methodologies and formulate one-of-a-kind designs that mirror your individual style and dispositio
Choosing the Right Pair of Jeans for Distressing
Before embarking on the journey of distressing your jeans, it’s crucial to select the right pair. Seek out jeans crafted from sturdy denim fabric with a well-fitting design. Skinny jeans or straight-leg jeans are optimal candidates for distressing, as they offer a sleek canvas for the art of distressing.
Factor in the hue of the jeans as well. Light wash or medium wash jeans tend to accentuate distressing techniques more prominently, whereas dark wash jeans impart a subdued, well-worn appearance. Ultimately, your choice hinges on personal preference and the style you’re aiming to achieve.
Gathering the Necessary Tools and Materials
As you delve into the process of distressing jeans using sandpaper, scissors, and bleach, you’ll require a set of tools and materials:
- Sandpaper: Opt for medium to coarse grit sandpaper, as it’s instrumental in producing the desired distressed effect on your jeans.
- Scissors: A pair of sharp scissors will enable you to deftly cut through the denim.
- Bleach: Bleach serves to fade the color of your jeans, contributing to a more weathered appearance. It’s imperative to employ bleach in a well-ventilated area and adhere to the safety instructions provided on the packaging.
- Spray Bottle: This handy tool allows you to apply bleach to your jeans in a controlled manner.
- Rubber Gloves: Shield your hands from potential irritation by wearing rubber gloves while working with bleach.
- Plastic Sheet or Garbage Bags: Lay down a protective barrier beneath your work area to safeguard it against any inadvertent bleach spills.
Armed with these materials, let’s transition to preparing your jeans for the distressing process.
Preparing the Jeans for Distressing
To ensure optimal outcomes, it’s essential to prepare your jeans meticulously. Follow these steps:
- Wash and Dry: Commence by thoroughly washing and drying your jeans to eliminate any dirt or debris. This preliminary step facilitates a smoother and more effective distressing process.
- Mark Distressing Areas: Employ a fabric pencil or chalk to mark the sections on your jeans that you intend to distress. These markings will serve as your guide when you begin sanding, cutting, or applying bleach.
- Lay Flat: Place your jeans on a level surface, such as a table, ensuring they are free of wrinkles or creases. This sets the stage for an even more distressing procedure.
With your jeans prepped, it’s now time to delve into the engaging task of distressing!
Distressing Jeans with Sandpaper
-
Start With Coarse-Grit Sandpaper
Begin by using the coarse-grit sandpaper (60-80 grit) to generate larger and more prominent distressed areas. Fold the sandpaper and gently rub it against the denim in the marked zones. Experiment with horizontal lines, vertical strokes, or circular motions to mimic the patterns of natural wear.
-
Switch to Fine-Grit Sandpaper
After attaining the desired level of distressing with the coarse-grit sandpaper, transition to the fine-grit variant (120-220 grit), this stage refines the distressed regions and imparts a smoother, more natural fade.
-
Vary Pressure and Technique
Employ varying degrees of pressure and diverse rubbing techniques to produce an authentic distressed appearance. Adjust your pressure for subtle fading versus more pronounced distressing.
-
Blend the Edges
To achieve a seamless appearance, gently blend the edges of the distressed sections with the fine-grit sandpaper. This subtle blending softens harsh lines and establishes a gradual transition between distressed and non-distressed areas.
-
Create Small Frays
For added texture, delicately rub the edges of the distressed areas with the sandpaper to create subtle fraying. Exercise caution to avoid excessive fraying that could lead to unintended holes.
-
Assess the Look
Regularly step back and evaluate the distressed areas as you progress. Remember that moderation can often yield superior results, as it’s easier to incrementally add distressing than to reverse an excess.
-
Wash and Wear
Once content with the level of distressing, wash the jeans to eliminate any sandpaper residue and soften the denim. The distressing will appear even more natural after a few washes and wears.
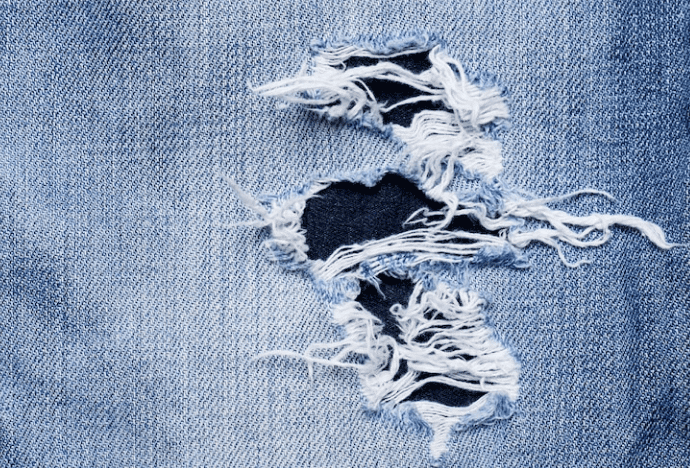
Distressing Jeans With Scissors
-
Cutting
Utilise the scissors to create small incisions or slits in the designated areas. Start with conservative cuts, as you can always expand them later if necessary. For a more organic appearance, vary the lengths and angles of the cuts. Experiment with horizontal slits, vertical snips, or even diagonal slashes.
-
Pulling Threads
After making the cuts, tweezers come into play. Gently extract some of the vertical threads from the denim to foster a frayed effect, enhancing the authenticity of the distressing. Exercise caution not to overpluck threads, as this could compromise the fabric’s integrity.
-
Washing and Wearing
Once you’ve achieved your preferred level of distressing, consider washing the jeans. This action softens the cut edges and confers a natural demeanor upon the jeans. Over time, as you wash and wear the jeans, the distressing will further come to life, adding depth and character.
-
Finishing Touches
If you find that the distressing doesn’t appear as organic as desired, don’t hesitate to revisit the process. Sometimes, a few additional cuts or adjustments can yield the desired effect. Remember that moderation often yields the most appealing results, so take your time and evaluate the overall look.
Distressing Jeans With Bleach
-
Dilute the Bleach
Prepare a solution of bleach and water in a plastic spray bottle. The precise ratio hinges on the intensity of the bleaching effect you wish to achieve. Commence with a higher concentration of water to bleach for a subtler fade. A common starting point is approximately 1 part bleach to 3 parts water.
-
Test an Inconspicuous Area
Before administering the bleach to visible sections of the jeans, conduct a test on a concealed or unnoticeable spot. This helps determine how the fabric reacts to the solution and if the dilution meets your intended outcome.
-
Spray the Jeans
Don protective plastic gloves and lay the jeans flat. Begin spraying the diluted bleach mixture onto the targeted distressing areas. You can focus on specific regions like knees, thighs, and edges or opt for a comprehensive faded appearance.
-
Wait and Monitor
Allow the bleach a few minutes to interact with the fabric. Vigilantly observe the transformation of colour. The bleach initiates a lightening effect on the denim, so monitor the progress to achieve your desired level of distressing.
-
Neutralise and Rinse
Once satisfied with the bleaching outcome, rinse the jeans thoroughly with water to halt the bleaching process. A mix of water and mild detergent can help neutralize the bleach as well.
-
Wash the Jeans
Following rinsing, launder the jeans separately from other garments to eliminate any residual bleach. This step also contributes to the fabric’s softening, rendering the jeans more comfortable for wear.
Conclusion
In summary, the art of distressing jeans via sandpaper, scissors, and bleach presents a dynamic avenue to infuse your wardrobe with individuality and flair. The allure of this trend lies in its ability to seamlessly amalgamate rugged elegance and timeless nostalgia. Distressed jeans harmoniously adapt to diverse occasions, imbuing an aura of casual sophistication. They encapsulate a carefree spirit that allows your creativity to flourish, all while evoking a laid-back attitude.
By thoughtfully selecting the right jeans, gathering the essential tools, and meticulously following the distressing techniques, you will ultimately achieve a bespoke, authentically weathered appearance that seamlessly integrates into your fashion repertoire.


